Apple OS X Server: Set up a VPN service connection on Mac

The VPN service included in OS X Server is a lightweight, easy-to-setup server component that allows end-users remote access to corporate data. By utilizing public networks, such as the Internet, VPN creates a secure tunnel that encrypts two-way communications between two end-points.
VPN is a must-have tool for employees working off-site or users who wish to access data on their home computers securely. It can also be used as a means to safely browse online when connected to public Wi-Fi.
Configure a VPN service

Here are the requirements for configuring VPN services in OS X Server:
- Apple computer with OS X Server installed (1.0+)
- Static IP address assigned to OS X Server *
- Broadband Internet access (Wi-Fi or Ethernet)
- Host name registered with 3rd-party name service **
- DNS entries registered with 3rd-party service and/or ISP **
- Firewall configuration to allow TCP/UDP ports ***
Follow these steps to configure a VPN service:
- Launch Server.app from the Applications folder, and select the server you wish to manage
- Login with administrative credentials
- Click VPN from the Services pane
- If running OS X Server 3.0, please note the known software bug (Figure A) that prevents clients from connecting to VPN servers (this issue was addressed by Apple and should be installed prior to proceeding with configuration)
Figure A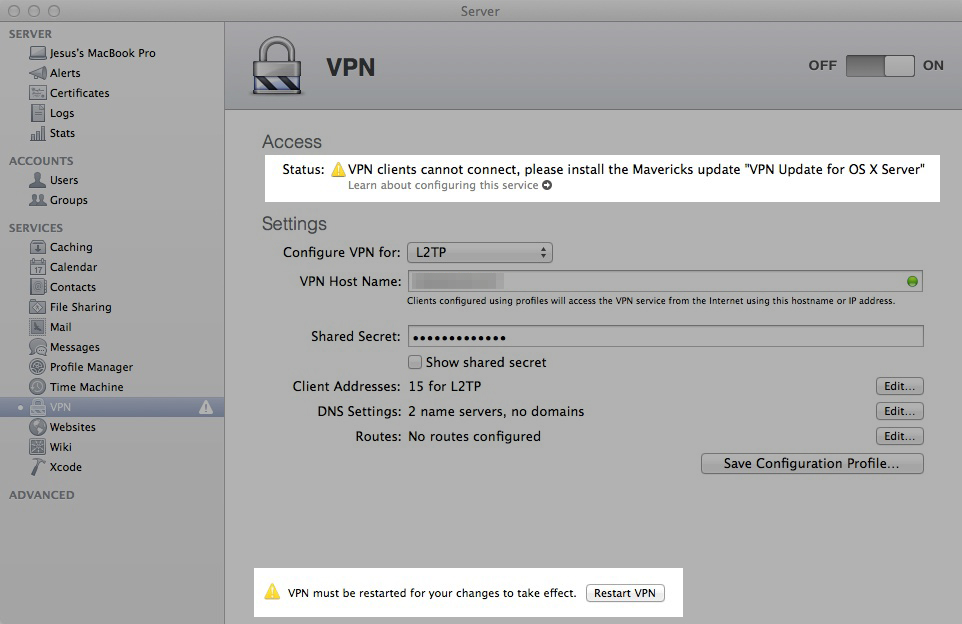
- Click the Restart VPN button for the changes to take effect
- Set Configure VPN for: L2TP (PPTP is considered cryptographically less secure and not recommended)
- Set VPN Host Name to either the static IP assigned to OS X Server or the hostname if configured through 3rd-party DNS entries or domain name registration (the latter allows access to the VPN server through a URL)
- Next, create a Shared Secret (Figure B). This passphrase will be used by the client end-point to authenticate with the VPN. Due to the secure nature of VPN access, the Shared Secret accepts alphanumeric characters and symbols. Like a password, it should be complex and not easy to guess.
Set up a VPN connection on Mac
To connect to a virtual private network (VPN), you need to enter configuration settings in Network preferences. These settings include the VPN server address, account name, and any authentication settings, such as a password or a certificate you received from the network administrator.
If you received a VPN settings file from your network administrator, you can import it to set up your connection. If you didn’t, you can enter the settings manually.
Import a VPN settings file
On your Mac, do one of the following:
Double-click the file to open Network preferences and automatically import the settings.
Choose Apple menu

 , then choose Import Configurations. Select the file, then click Import.

Enter VPN settings manually
On your Mac, choose Apple menu
Click the Add button
 in the list on the left, click the Interface pop-up menu, then choose VPN.
Click the VPN Type pop-up menu, then choose what kind of VPN connection you want to set up, depending on the network you are connecting to. Give the VPN service a name, then click Create.
L2TP is an extension of the Point-to-Point Tunnelling Protocol used by internet service providers to enable a VPN over the internet.
IPSec (Internet Protocol Security) is a set of security protocols.
IKEv2 is a protocol that sets up a security association in IPSec.
Enter the server address and the account name for the VPN connection.
Click Authentication Settings, then enter the information you received from the network administrator.
If specified by your network administrator, click Advanced to enter additional information such as session options, TCP/IP settings, DNS servers and proxies.
The additional information you can enter depends on the type of VPN connection you’re setting up.
Click Apply, then click OK.
Select “Show VPN status in menu bar” to use the VPN status icon to connect to the network and switch between VPN services.
To remove the VPN configuration, select the VPN network connection service in the list and click the Remove button


Comments
Post a Comment